
Monday, 28 December 2009
Christmas 2009, a short break but a lot of work
I've taken a break from blogging over the Christmas period, however I have been hard at work with my time-lapse project, and starting my preparation for next terms projects.
Monday, 14 December 2009
Inspiration... Trapcode
Ive just been looking at the new trapcode website and it has some great examples of work...
MOTOR / AMBIENT REEL from KU-SCHNEIDER on Vimeo.
let yourself feel. from Esteban Diácono on Vimeo.
MOTOR / AMBIENT REEL from KU-SCHNEIDER on Vimeo.
let yourself feel. from Esteban Diácono on Vimeo.
Monday, 7 December 2009
Work... JSF & BMS idents
I have finished my two idents.
The audio on both have been created using Video Copilots Pro Scores and Designer Sound FX.
The text were created in Illustrator and animated in After Effects.
Jack Shelbourn Films Ident.
This was done with a lot of layer styles. The text was created with a texture using the text as a trak matte. The box's appearance was created using a stroke. The text animation was created by enabling per character 3D and using a ranger selector for the position.
Box Media Studio Ident.
This was created with a lot of vector blur, and multiple particle emitters. The text was blurred on to the screen and then the position was animated.
[I will link the video when it is uploaded]
Lincoln... Media Production 1, B - Timelapse test
Just got back from my first timelapse test. It looks great, im very happy with the results.
I'm going to get planning and head out during the week and get plenty of pictures.
I'm aiming for the piece to be 3-5 mins long...
I'm going to get planning and head out during the week and get plenty of pictures.
I'm aiming for the piece to be 3-5 mins long...
Sunday, 6 December 2009
Work... The Money Shop
For a few years I have been doing Motion Graphics work for FWD.
One client that my work has been used by in The Money Shop,
I create the banners that are played during football matches on the LED advertising screens.
I have done quite a few banners so far and they have been played during many games.
The most memorable game was England's 4-1 win over Croatia in the World Cup 2010 qualifing campaign.
This was doubly special as it was the first time one of my banners had been played, and to top it off my banner was playing as Theo Walcott scored a goal.
My banner work can be seen in my Show Reel on my Vimeo channel.
Lincoln... Media Production 1, B - inspiration 01
I found this on Vimeo just as I've decided to do time lapse.
Its just fantastic, the pans and zooms are incredible.
The shot with the stars in the back ground is truly remarkable.
movie & piano : mockmoon
equipment : Canon 5DmarkII & Nikon D3
place : Pref Gunma, Nagano, and Nigata Japan
Its just fantastic, the pans and zooms are incredible.
The shot with the stars in the back ground is truly remarkable.
movie & piano : mockmoon
equipment : Canon 5DmarkII & Nikon D3
place : Pref Gunma, Nagano, and Nigata Japan
Lincoln... Media Production 1, B - Plan
I will write out my formal propaosal soon, but for now I have decided to do my second piece of course work on Time lapse photography.
I will use my DSLR to take images at timed intervals during a 2-5 hour period.
These will then be placed together as footage in Adobe After Effects.
This will give the impression of footage taken over many hours and sped up.
I will use shutter speeds upward of a second to generate a good amount of motion blur.
I also intent to have a go at panning and zooming.
Unfortunately the University doesn't have a Digital Intervalometer, so i'll have to take each picture manually, which could lead to many problems in the final edit.
Saturday, 5 December 2009
Work... 2009 Show Reel
Today I received the sound track for my show reel, so after a quick render it has been completed.
This is a selection of my best work from 2009 (and a few things from earlier).
I'm really proud of what I have achieved so far, and im already thinking about my 2010 reel...
2009 Show Reel...
Thanks to Dexter Prior for the great music.
This is a selection of my best work from 2009 (and a few things from earlier).
I'm really proud of what I have achieved so far, and im already thinking about my 2010 reel...
2009 Show Reel...
Thanks to Dexter Prior for the great music.
Work... Green screen studio
Today I was at V Point's studio in Nottingham.
I got to watch a rough cut of the commercial as well as some green screen filming and a photo shoot.
I also got to see the inner workings of a production house, the kind of place I would like to work in the future.


It was a very nice conclusion to a great experience.
I got to watch a rough cut of the commercial as well as some green screen filming and a photo shoot.
I also got to see the inner workings of a production house, the kind of place I would like to work in the future.


It was a very nice conclusion to a great experience.
Thursday, 3 December 2009
Lincoln... Documantary tutorial week 2, with Nick Grey
Today I had my second and final class with award winning documentary maker Nick Grey.
Today we focused on interviews.
We looked at interviewing techniques, lighting set up and framing.
These are some pictures I took of the set up...


Today we focused on interviews.
We looked at interviewing techniques, lighting set up and framing.
These are some pictures I took of the set up...


Here are my notes from the class.
Interview types:
One on Ones.
- Get under a persons skin
- Understand there world
- Reveal character
Informal.
- Follow some one, chip in questions
- choose moments to ask
Fly on wall.
- Contributers forget your there
Formal.
- Staged
- Suitable place
- Studio
- Home
- Long
- Voice Over
- Quite, good sound
- Easy Edit
Vox Pops.
- Street
- Public
- Ask open questions, yes/no answer
Setting up an interview:
Camera.
- Set up/Positioning
Lighting.
- Soft light
- position
- set up
Framing.
- Shot size
- Eye line
Respond to director.
- Have signals
- plans, for zooms etc.
Audio.
- Mics
- Boom, Neck
- Use of questions
- Voice over
The Edit.
- How will it be cut
- Direction
- The Line
Style and Mood.
- Lighting
- Camera in View
- What mood?
- Colour
- Darker
- Brighter
Location.
- Pick it well
- Cutaways
- Able to control the interview
What not to do:
- Don't set up a camera and equipment without informing about what you are doing
- Don't let the interviewee wait around
- Don't encourage unnecessary bystanders
- Don't fire straight into questions
- Don't give evidence of own insecurity's
- Don't be unprepared
- Avoid interruptions
- Don't forget the interviewee's name or important details
- Don't ask closed questions
- Don't as too many questions in the same sentence
- Don't be to relaxed, watch your posture
- Don't give verbal feedback
- Don't ask irrelevant questions
- Don't write things down as a person is responding
- Don't make the interview to short or to long
Rules:
- Know what the film is about
- Prepare, Prepare, Prepare
- Build Rapport
- Active Listening
- Interview for the edit
Hints:
- Plan the questions
- To produce responses
- answer in whole sentences
- wait at the end of a response, for the edit or for the interviewee to add something
- Questions can be skeptical but not sarcastic
- Maintain eye contact
- Listen to the questions
- use follow up questions
- interview for the edit
- sound bites
- Don't give control to the interviewee
- Listen to the subtext
- Use researchers when possible
- Use silences
- breathing room
- wait for answer
- interviewee's dont like silence
- Ethics
- fair
- represent fairly what they say in the edit
- inform the contributers the truth
- Opportunism
- Take opportunity's
It was great to have these lessons. Nick was a very nice man, and i learnt a lot from him. He always listened to my ideas with enthusiasm, although perhaps with a look of confusion...
Work... Romford filming, Conclusion
I learnt a lot from the team at V point as well as all the hands on experience I was allowed to have.
I really enjoyed it, and I'm going to investigate a career in commercial advertising.
This is a picture of Maria, the model used by The Money Shop, and myself.

I really enjoyed it, and I'm going to investigate a career in commercial advertising.
This is a picture of Maria, the model used by The Money Shop, and myself.

Work... Romford filming, Sound
Audio had far less time spent on it, but was treated with as much importance.
The store was near a bus terminal, so filming was done with this in mind.
Recording would only be done when the sound recorder was happy with the audio.
Recording was done with a boom mic as opposed to a neck mic.

The store was near a bus terminal, so filming was done with this in mind.
Recording would only be done when the sound recorder was happy with the audio.
Recording was done with a boom mic as opposed to a neck mic.

Work... Romford filming, lighting
The thing that took the most time was setting up the lighting.
So many lights and tequniques were used.
A lot of the lights were standard Red Heads, but the also used a 1K Blond and some smaller lights.
Gels and reflectors as well as diffusers were used.
Reflective surfaces were replaced with matte ones, such as posters, and a lot of time was taken to remove 'hot' spots and shadows.
This was set up per shot, so took up much of the day.


Work... Romford filming, Intro and Camera
I was in Romford on Sunday and Monday filming the 'behind the scenes' of commercial shoot for The Money Shop, in the new Romford Branch.
I was working for a company called FWD who are the agency behind the commercial.
The production company involved was called V Point, from Nottingham.
This was my first hands on experience of a commercial shoot and I was blown away. The amount of time spent on every little detail, with lighting, make up, hair, movement, script. It was great.
I spent the two days watching, taking notes and learning as much as I could.
Every one was great, and willing to answer all the questions I had.
I took a massive interest into the camera. It was a great piece of kit. I really began to understand the practical uses of having a monitor to view the shots with, especially with 4 or 5 people wanting to look at once.
I was also introduced to XDCAM HD, the hard disk recording method for broadcast quality Sony cameras. Its similar to a Blu-ray disc, but in a casing like a large UMD.
It was great as it was similar to the hard disk system on my Sony Handycam, but with higher capacity, faster write times, and the ability to store the disks on a shelve. Which for me is an advantage over SDHC or P2.


Saturday, 28 November 2009
Work... Weekend away
I'll be heading down to Romford this weekend to do some filming for a company called FWD Creative.
Ill be taking my Canon G10 and my Sony HD Handy Cam with me.
Must remember to charge the battery's...
Ill be taking my Canon G10 and my Sony HD Handy Cam with me.
Must remember to charge the battery's...
Friday, 27 November 2009
Lincoln... Studio fun and long renders
I went back into the studio today and helped out with some vison mixing.
It was the first time I've given it a go in a few years and it reminded me of its appeal as well as made me want to work in TV again, a bit.
So instead of narrowing my career down I've, so far on my masters, regained an interest in everything.
Ive also finished another motion logo, or Ident. This time for Box Media Studio.
This represents my motion graphics work and special effects work.
This took a grand total of 5 hours to render an 18 second sequence.
Ive also improved the Jack Shelbourn Films ident.
I'll get these two uploaded soon...
Thursday, 26 November 2009
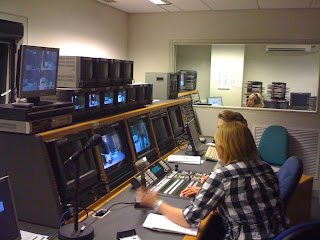
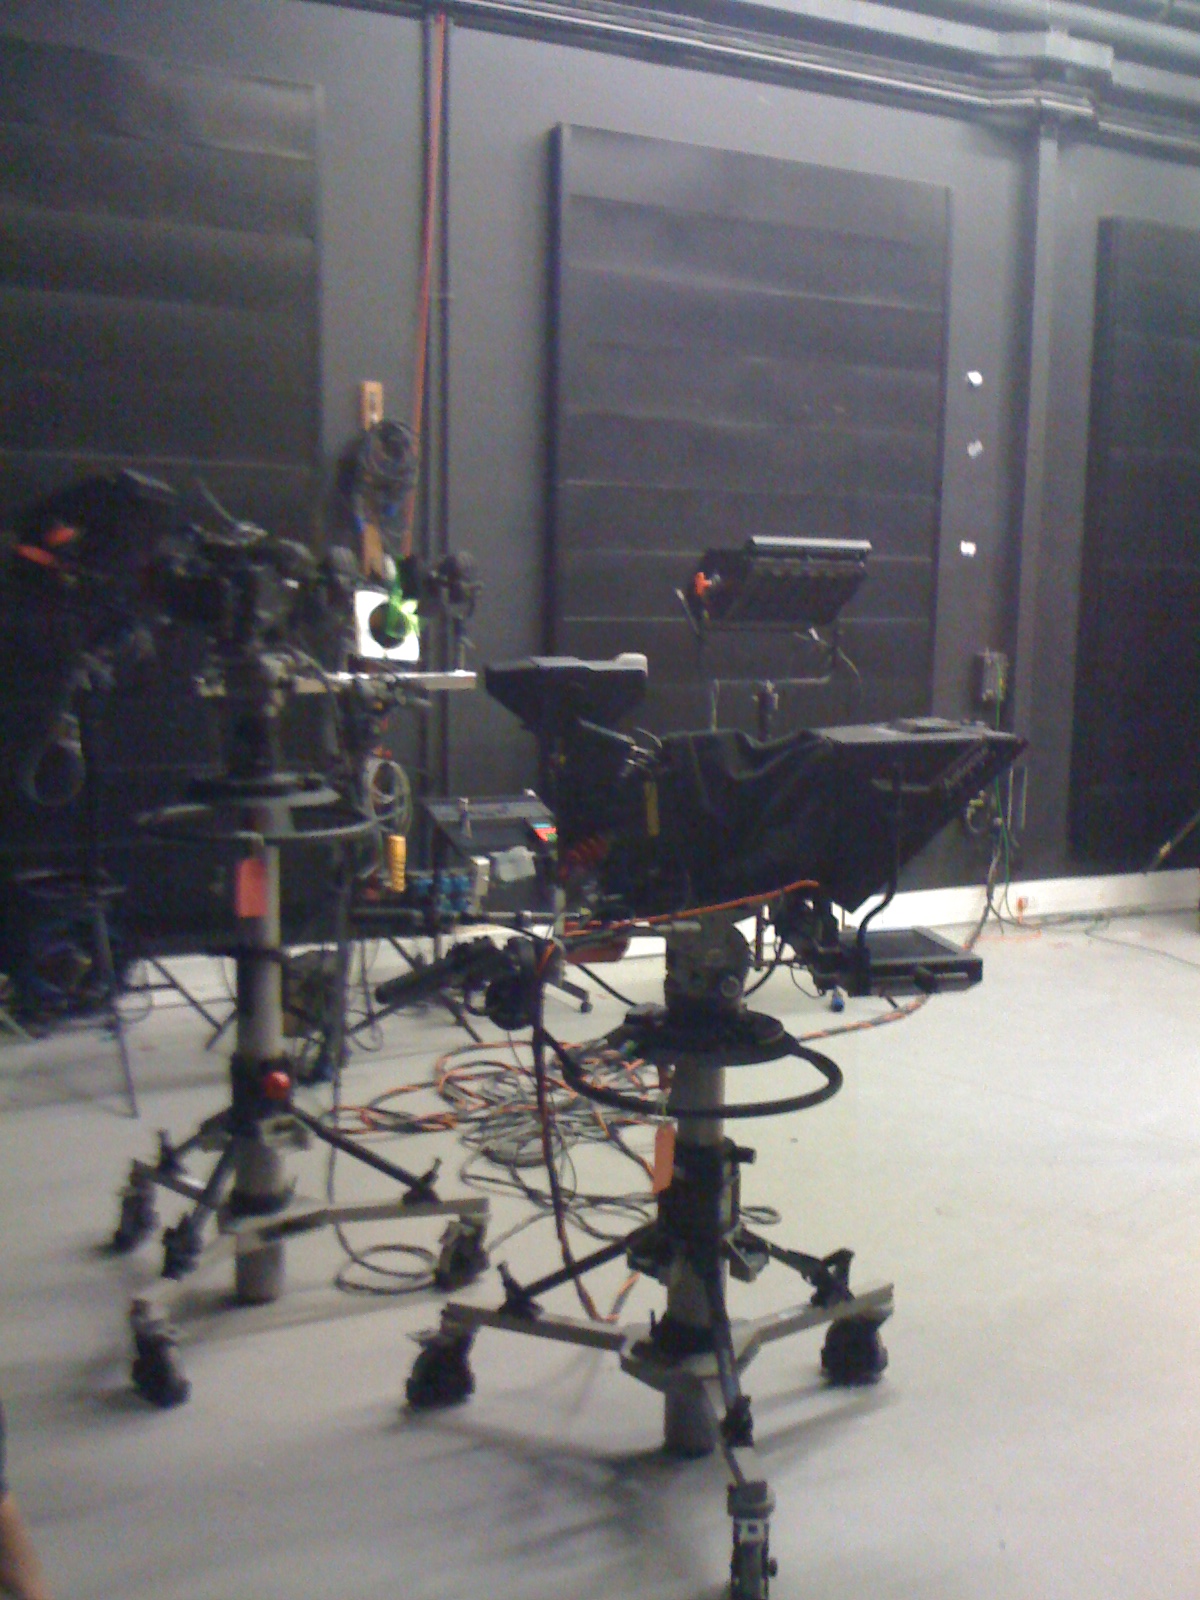
Lincoln... A look at the Studio
Yesterday I spent some time in the large studio at the University with some of my friends in there third year, filming there multi camera coursework.
It was the first time ive seen the studio and the gallery in action, and I was taken back by there set.
It was so wonderfully simply yet very effective on camera.
It was also my first chance to look at the equipment there.
It has given me a lot to think about for my film I intend on making in the summer.
Here are some pictures from the studio...


Wednesday, 25 November 2009
Lincoln... Working as a team, Youth
I just wanted to share a piece of work done by my good friend Stephen Milnes. He is on the MA here at Lincoln with me and for his first piece, where I created a portrait of a dancer, he created a portrait of our friend Craig.
I think its a great piece of work for a first attempt, far higher standard than 1st year undergrads, and Steve hadn't made a film since college.
It captures Craig quite well, and I'm sure with a little bit more time and editing the whole piece can be finished of nicely.
So I present to you Youth, a Stephen Milnes Film...
Work in progress... Jack Shelbourn Films ident
I spent a part of today working on the ident for Jack Shelbourn Films that I'll use at my time at Lincoln.
Its simple and still needs work.
The music was created with Pro Scores by Video Copilot, but I intend to have some music composed for the final version.
The look of the text was created with a culmination of track mattes and layer styles.
Such as drop shadow and emboss.
The 3D text movement was created by enabling per character 3D and using a range selector set to ramp.
I am very happy with the opening but I'm not sure about the fade into the red. I was trying to incorporate the style of logo and colour scheme used on my web pages, but so far it doesn't quite fit...
Tuesday, 24 November 2009
Lincoln... Documantary tutorial week 1, with Nick Grey
Ive just come back from a class Tutorial with directer and producer Nick Grey.
He is well know for his factual documentary films such as Escape From Tibet, a documentary about people fleeing Tibet to India for safety.
He was also part of the team that created the Docusoap Genre when working on a television program called Jimmy's. This was a factual, with no commentary, program set in a hospital. With no actors it used real life story's to fill the program.
This lead to more programs such as Children's Hospital and Airport'by the BBC.
It was also asked to be seen by the producer of ER before that was created.
It was a great opportunity to learn from his experiences.
This week we looked at Observatory documentary, such as that seen in Jimmy's.
We did our own recreation of a scene, and we looked at camera work, lighting, sound and setting up shots as well as working with ordinary people.
We also discussed the eliments of a documentary;
-Interviews
-Sequences
-Peoples homes
- Actuality
-wallpaper for interviews
-Narrative
-Story, Ark and Spine
-Life, Chronological
-Events ad Characters
-Metaphor
-Music
-Style
-Movement
-Colour
Different types of documentarys, such as,
-Reconstruction,
-Undercover
-Animation
The basic Grammar of a documentary shoot;
-Events/Sequences
-Camera Positioning
-General Views, or GV's
-Place
-Postcard Shots
-Establishing shots
-set ups
-Interviews
-location
-Good Questions, follow up questions
-Commentary Voice
-Good sound
-Less words the better
-Don't offer opinions, but help the audience along
Always think about;
-Access and Consent
-Health and Safety
-Style and Direction
-Context
Finally some tips;
Planning:
Research, Research, Research. Always view the place of shooting first. Understand the process of whats being filmed, don't get caught out. Get to know your contributers, always communicate what it is your doing and why.
Filming:
Explain to your contributers why cut aways, that may seem dull to them are needed. Think about the edit when filming as much as possible, have people entering on the correct side of camera. Filming in someones home can help them relax and show character. Finally understand body language as it can help you guess what actions will happen next.
Edit:
Think of the context, don't use editing to create falsehoods. Use establishing shots. You don't need to say what they are seeing people can work it out for themselves .
Audio:
A clean sound track is money in the bank, do as much as possible to get one. Clear dialog and good quality actuality and backing tracks, finish the shots of well. Take note of the surroundings, such as squeaky chairs and bleeping machines. Finally spend time getting the voice over right. If there is one it will be there to tell a story, so have them read as if they were, with good pace.
Next week we are looking at interviews.
Monday, 23 November 2009
Lincoln... Media crew, Logo
I was asked to create the Media Crew logo and a motion logo for the beginning of clips created by the Media Crew.
It is made up of vectors that I created, and animated in After Effects.
The Begining logo is the Student Union logo, I did not make this but I did trace it in Illustrator to create the vectors.
I did create the Media Crew logo.
It is based on the University of Lincoln's Media Centre logo.
It is made up of vectors that I created, and animated in After Effects.
The Begining logo is the Student Union logo, I did not make this but I did trace it in Illustrator to create the vectors.
I did create the Media Crew logo.
It is based on the University of Lincoln's Media Centre logo.
Lincoln... Media Production 1, B - Introduction
This is an extract from the module hand book...
MED 9311 Project 2
Assigned Theme “Public, Private Space”
Definitions:
Def. Public – “ … relating to people as a whole”
Def. Private – “ … not for general or public use. Confidential or secret”
Space – “ …an interval of distance”
Brief
The assigned theme “ Public Private Space “ should be used for creative exploration and as a starting point to create a completed audio/visual piece which explores some aspect of the concept of space in relation to personal and public domains. Other linked starting points may include surveillance/ social/ community/ identity/ freedom/ restraint/ environment/ disassociation/ deviation, macro / micro etc.)
Personal responses and research into aspects of the theme should result in a tightly conceived piece which should aim to focus upon expressing the central theme(s) in a rounded form & genre which is “ self standing”. It may be factual, fictional or experimental in outcome and should illustrate the ability to use A/V media creatively to convey content in a coherent and informative form.
Something to Share... Red Cameras
Id just like to share this link...
Its to RED cameras.
Bassically I want to own one at some point.


 There probably the nicest looking cameras in existence, and there modular design means there use has no end.
Its to RED cameras.
Bassically I want to own one at some point.


 There probably the nicest looking cameras in existence, and there modular design means there use has no end.
Lincoln... Media Production 1, A
So far I have finished one piece of course work.
This first piece of course work was just a small piece to get the students of the MA up to date and to make sure we can all use the Univeristy equipment, such as the camera that is reserved for the MA students only.
These are the Panasonic AG-HMC151.

[Picture taken during Stephen Milnes shooting of his film for the MA, entitled, Youth]
For my piece I wanted to test out the cameras but also to continue developing my skills on After Effects.
As well as this I wanted to try my skills at directing someone other than my brother or cousins, who featured in everything that required an actor.
Our brief was to create a portrait.
I decided to create a portrait of a dancer, so I contacted a few people and in the end I found a great Dancer named Lizzie O'Reilly.
For my piece I took inspiration from Pierre Michel's Fire Flower.
[Fire Flower by Pierre Michel]
I loved the way he manipulates the particles in this piece and I wished to emulate this some how.
I decided to show how a dancer gains inspiration and then creates there own interpretation of that inspiration.
I showed this through mimicking the idea of creation and the big bang.
I created a short report on how I made some of the more complicated scenes, including the colour correction and the camera expressions that I used.
Inspiration and Creation:
This first piece of course work was just a small piece to get the students of the MA up to date and to make sure we can all use the Univeristy equipment, such as the camera that is reserved for the MA students only.
These are the Panasonic AG-HMC151.

For my piece I wanted to test out the cameras but also to continue developing my skills on After Effects.
As well as this I wanted to try my skills at directing someone other than my brother or cousins, who featured in everything that required an actor.
Our brief was to create a portrait.
I decided to create a portrait of a dancer, so I contacted a few people and in the end I found a great Dancer named Lizzie O'Reilly.
For my piece I took inspiration from Pierre Michel's Fire Flower.
[Fire Flower by Pierre Michel]
I loved the way he manipulates the particles in this piece and I wished to emulate this some how.
I decided to show how a dancer gains inspiration and then creates there own interpretation of that inspiration.
I showed this through mimicking the idea of creation and the big bang.
I created a short report on how I made some of the more complicated scenes, including the colour correction and the camera expressions that I used.
Inspiration and Creation:
Sunday, 22 November 2009
Lincoln... Introduction
Thats it for the story so far up to Lincoln.
I am now a student at the University of Lincoln Studying for my MA.
I have 3 semesters during my 1 year at Lincoln.
Each with practical and acamedic modules.
The academic modules involve reading and essay writing. Something I haven't done in a while...
For Semester A I have two pieces of practical to do. One small and one large, split 25% and 75%.
Semester B I have one big piece of practical as well as my research and pre-production files for my final piece to do. I intend to focus on Photography and Maya in this semester.
And finally Semester C is the production and post-production time for my film.
Story so far... Summer 2009
I graduated from De Montfort University as a Bachelor of Science (Honours) First Class, in Media Production. With a final average of 71%.
With this I spent much of this summer relaxing after work from the last year had wiped me out.
I did however gain my 3rd PC. At this point I knew I had a place on the MA course that I wanted. So in September of 2009 I would be enrolling in the MA Media Production course at the Univeristy of Lincoln.
So my new PC was to complent that.
It is a 3D Boxx 4950 workstation.

The aim of my Masters Degree is to:
Learn more,
Improve more,
and to make a film.
This computer is the perfect companion for that.
With this new PC I got the 2009 Maya suite.
I spent some time learning this over the summer, however I found it difficult to get into and found my self wanting it to be Blender, but knowing it was the inductry standard I pursued.
I gained alot of Knowledge from the Gnoman Workshop.
I however didnt learn as much as I would have liked over the summer, and in tern lost touch with Blender.
I intend to continue learning Maya at the beginning of 2010 in preparation of my film.
Story so far... DMU Technology Project
Over the whole of my final year I created a Technology Project. This was my equivalent to a dissertation that other degrees ask for.
For this I created a Blu-ray disc, with full artwork for the case and disc, that held full HD content. This was a music video, visualisations for audio tracks, and picture gallery's. The music video was also produced with 5.1 audio.
The music video is a stop motion video created using Lego.
I produced this with all original material from cardboardbox (the band I mentioned a few post earlier)
I spent the whole year producing this, along side a 7000 word report.
I used all the skills I had learnt at university.
I also used audio skills that I learnt from being in a band.
The programs used were:
-Adobe After Effects,
-Adobe Encore,
-Adobe Premiere,
-Adobe Illustrator,
-Adobe Photoshop,
-Adobe Audition 3.0
-Trapcode Particular,
-Trapcode Form,
-Trapcode Star Glow,
-Trapcode Shine,
-Trapcode 3D Stroke,
-Magic Bullet Looks.
I wont go into the full workings of how I did this but here is a link to my report if you wish to read it.
And here is some key screenshots.
My Report:

On set for the video:


Story so far... DMU year 3, term 2
For my second term I had to create a TV intro and a Movie intro. These needed to be stand alone with no footage either side. So just the opening sequences.
Both of my final decisions on what to make were heavily influenced by the Cinema. I had just watched the latest James Bond film, Quantum of Solice. I loved the opening Credits for this so much I decided instantly that I was going to create my own James Bond opening sequence.
Now I knew what I was going to make, I needed a theme for my film.
At the time I had my radio was set to switch on as my alarm in the mornings, and one morning my radio switched on, woke me up at the exact time a song started. That song was Rain on your Parade, by Duffy. I knew instantly that I had my song! (I have only just noticed when linking the song to its wiki page that it is quoted as having a 'James Bond-esque sound', therefore proof that great minds think alike! )
The song works perfectly as a James Bond theme. It has all the movements that you could desire, as well as the common instruments of a Bond Theme.
The song has dark tones and I saw dark purple and blues as I listened to it. This decided the colours I wished to use.
I decided early on I wanted to film my characters the same was I filmed my music video in the first year.
This would mean filming in front of a white screen and luma keying the characters to create a stencil effects.
At the time I was beginning to under stand Trapcode Form really well. Therefore I decided to use this as the main tool for my work.
I created the back ground using Trapcode Horizon. I then moved a camera through 3D space as Trapcode Form was set to move to the music with some additional controlled parameters.
On top of this the silhouettes of the characters and a gun were combined with Form, Star Glow and at times Shine.
Text was added and manipulated over an uncompressed render of the final sequence.
Some blurs such as CC radial blur were added to some parts. And Particular was used as gun shots and explosions.
Final colour enhancement was done with Magic Bullet Looks.
For me this is one of the most enjoyable and highest quality pieces of work I have ever done. I still enjoy watching the video and the feeling the visuals combined with the audio create.
After this Motion Graphics became more of a for front in my activity's.
My TV intro, as stated earlier, was inspired by the Cinema as well. At this point I had just seen the first full trailer for the Star Trek XI film.
Being very excited about this I decided to make my own Star Trek opening.
At the time I was at the hight of my Knowledge with Blender and 3D modelling. So I created my Enterprise, which I wanted to be different from the ones seen before.
I did all the modelling, texturing and lighting in Blender.
I animated the ship and the camera in Blender and Rendered it straight out of the program as well.
I created the planet, comet and explosions in After Effects. This included heavy use of Particular.
The background was made with Horizon, but the back ground once the ship appears was all done inside Blender.
For when the ship goes to warp the effect was created with Star Glow, Shine and lens flares.
All of the text was treated with Star Glow.
I used the music from The Next Generation. I also paid homage to the Original Series intro and the Next Generation, with the ship flying past the camera.
This was great fun to make and I enjoyed ever second of it. Even though it was course work, and I did very well with it, I was glad to make it and get it out of my system.
I even did the captains voice over myself, even though my voice doesn't quite suit it, it was a chance that I wasn't going to miss.
Saturday, 21 November 2009
Story so far... DMU year 3, term 1
During my third year at De Montfort I continued to develop my skills with After effects and Photoshop, but in addition I began to use Adobe Encore for more than just a basic menu with one button. I also had my first experience with the AVID Media Composer.
Alongside my modules in film making and digital effects I took a module in Advanced Imaging Techniques. This module focused on raw Photography, with no editing. Through this I gained a better understanding of composition and lighting.
I had 3 main projects involving Adobe this year and one using AVID.
My first introduction to AVID was to create a short piece of film that could fit into a news magazine show. For example the One Show, or a Local News show.
For my Piece I decided to create a short film that looked factual, but in reality was fiction with the use of actors.
The piece centred around an idea that cooking can be used as stress relief after a days work.
Through this I gained a basic knowledge of how AVID works. I found it very different at first, in comparison to Premiere Pro. But after some time I began to see some of the benefits of this system, and I then began to see how I can use Premiere in a similar way.
This in turn has helped speed up my editing technique.
Along with this my trip to BBC Wood Norton focused on post production. In this case the use of AVID and a meta data based system called Cinegy.
I learnt a lot from the expertise of the staff from Wood Norton that aided me through the rest of the year.
My first piece of coursework of the year on After Effects was an evolution of my skills I learnt from the second year.
The first major change was my move to HD. I had just received a Sony HD Handycam. So I decided to film my piece in full HD but composite and finish in 720p.
I again looked to Video Copliot for inspiration and knowledge, but I also used my own skills and imagination to create things unique to my work.
But along side this I had some new tools in my arsenal. I brought, with the help of my student discount, the Trapcode Suite from Red Giant Software.
This gave me some great tools.
A very powerful particle generator in Particular, a powerful static particle generator in Form, a light emitter in Lux, a very nice glow generator in Star Glow, an interesting audio controlling device called Sound Keys, a fantastic light generator called Shine, the ability to manipulate multiple instances of a layer with Echospace, the ability to create 3D strokes with 3D Stroke and finally a great tool to create back drops for 3D space with Horizon.
With these tools and the ability to work in HD I filmed a trailer for a fictional Sci-fi film.
Set in a post apocalyptic future the human race fight to stay alive against the alien race that almost drove them to extinction.
My main concentration for this piece was on the ending motion graphics and on adding action effects.
I composited muzzle flares on to battle scenes, and added mist. I composited two moons into some scenes.
I also used my new skills on Blender to create a battle in space and a crashed ship, which I composited along with fire on the ground.
I also filmed myself falling backward in front of a green screen. I then put myself in a room I created on Blender. This contained a reactor that explodes and blows my character up.
This containes plug-ins for working on footage such as, steading motion, effecting footage to make it look older, or improving older footage by removing artifacts and noise.
But the main attraction was Magic Bullet Looks.
This is a fantastic stand alone colour correction package. It allows you to effect and manipulate the colour and look of footage with lots of parameters. These can be saved as presets for later use. There are also plenty of presets already loaded in.
I achieved and learnt a lot in this piece of coursework. The quality of my work took a huge leap compared to Mega Team, from the year before.
I handed the final product in on Blu-ray with a full motion menu, as well as a case and disc label.
Friday, 20 November 2009
Story so far... Summer 2008
The summer between my second and third year saw a lot of developing and inspiration.
I spent much of the summer continuing to hone my skills on After Effects with the help of Video Copliot.
I also began a self taught journey with the open source 3D program Blender.
I used various online resources, but mainly through experimentation I gained a basic knowledge of the software program, which for something that is free its a great thing to have.
I also actively sought inspiration and came across a great Special Effects compositor called Pierre Michel.
I especially loved his work with particles, which lead to me taking a look at a program that I had heard being mentioned on Video Copilot as well. It was called Trapcode Particular.
This lead to myself finding a lot of inspiration from the Trapcode website itself.
It has a great Gallery of work done using its products.
At the end of the Summer I received my Second computer. This was a huge update on my old system.
It was set up ready for HD creation, with 8GB of RAM, plenty of storage space, and a 3.00Ghz Quad core processor.

I was very lucky to have this system. It opened up many possibilities over the next year because it aloud me to work twice as fast as before.
Thursday, 19 November 2009
Story so far... DMU Year 2
My second year at DMU is when Film making truly kicks off for me with the introduction of Adobe After Effects.
When I first looked at this package I hated it! It didn't resemble the editing software I was used to and there for wasn't happy with its existence and emphasis in the course work brief!
However a few weeks into the year my house mate Beth Cunningham showed me a website, a website that would not only influence me, teach me, but become my bible.
That website of course is the wonderful Video Copilot.
The tutorials on this website are the backbone of my learning of After Effects. Each Tutorial, hosted by Andrew Kramer, not only informs perfectly but has a wonderful pace and brilliant humour!
The Basic Training section is truly perfect, there's nothing better that can introduce someone to After Effects than these 10 beautifully crafted tutorials.
They set out all the basics and prepare you to start on any project.
The other tutorials are set out in equally good humour and sense. They teach the user something fun, such as blowing up a planet or creating some great looking text.
The tutorials can often be over the top. But the reason for this is simple, they are giving you building blocks in which to apply these new skills to your own projects. As the same tools that you learn to blow up a planet can be applied to create some great exploding motion graphics.
So even if you cant see a direct reason to use, or watch the tutorial, you should because what you learn can be applied in so many more ways than what you simply see on the screen when
watching.
These tutorials and my own copy of After Effects confided me to my room for a year. Constantly experimenting and developing my motion graphics and compositing skills.
My coursework using After Effects was to create an opening sequence of a film followed by some footage.
At the time I was inspired by the first season of Heroes. So I decided to look back at Mega Team and redesign it with a modern twist.
The costumes were gone and the MS Paint special effects have been injected with After Effects super power.
The opening sequence of text was also inspired by classic Star Trek openings and the new Superman opening.
Set flying through space as the credits zoom in to picture and then zoom out, the camera slowly getting closer to a distant nebula.
As the credits end the camera breaks and slows to be in orbit of a planet. The camera begins to shake as a ship flies on to screen.
The screen goes black and noises of a ship can be heard.
The scene picks up on the ground of the planet with on of the characters scanning the area.
Next one of the other characters beams in out of thin air and states he has been looking for an entrance to an object.
The camera then looks over the shoulder of the two men to observe a massive crystal in the ground surrounded by smoke.
At that point a dark character appears and begins to speak. Before long a short battle breaks out between the three. With lightning flying about and jets of fire, time becomes distorted when the lighting meets. A massive energy ball is created. It then implodes before exploding knocking everyone to the ground...
Mega Te
am was filmed in a field near my house in Rutland.
All the effects were created using After Effects. A lot of this piece was heavily influenced by Video Copilot. As this was my first thing done on After Effects I took a lot of the tutorials literally, such as creating the planet, scene replacement and rotoscoping.
In addition to this I had also purchased some of the products from Video Copilot. Action Movie Essentials (discontinued) was used a lot in Mega Team.
The ship that flies by the camera was created by myself using plumbing parts, stuck together and then painted and filmed in front of a green screen.


Just after Christmas I went to the BBC Wood Norton, near Eavsham, for the first time. Here I received a weeks training in TV Studio work. I learnt camera work, floor management, mic set up, set arrangement and how to work within the Directors Gallery.
My Group created and filmed a Game show. It went very well and after a full live rehearsal we recorded a very good live show, for the fact we only created the concept the day before.
We were very lucky and had a great presenter for the day called Craig Rowe.
He was just brilliant, a pleasure to work with and made our script seem better than it was.
The second half of the year I was reintroduced to Photoshop. I continued increasing my skills and ended up creating the DVD cover for Mega Team. This was the start of taking presentation very seriously. After this I made the effort to hand in all work with the highest level of presentation. This being a DVD, or later a Blu-ray, cover, disc label, and inlays.
Subscribe to:
Posts (Atom)


